Showing posts with label NORTH AMERICAN. Show all posts

Tuesday, May 3, 2016

#347: Lemony Brussels Sprouts Salad with Pecans and Goat Cheese


So, there's rain outside and this whole week has been pretty dreary, but, to me, it still feels like spring is here!! And with it comes the influx of salad recipes (though, lets be real, I can have a good salad all-year round).  This salad is made with shaved brussel sprouts, that are softened with a nice basic lemon vinaigrette, and topped with chopped celery and pecans for extra crunch, and creamy soft goat cheese.


Lemony Brussels Sprouts Salad with Pecans and Goat Cheese

Ingredients
Juice of 1 lemon
2 oz chopped pecans
2 10 oz bags of shaved brussels sprouts
1/2 cup olive oil
salt + pepper
1 tablespoon maple syrup 
1 avocado, chopped
goat cheese  

Directions
  1. Rinse and drain your shaved brussels sprouts in a colander.  Set aside. 
  2. Prepare a quick lemon dressing, by whisking together the lemon juice, maple syrup (or agave or honey), salt + pepper and olive oil in a small bowl.  Set aside.  
  3. In a medium sized bowl add the cleaned brussels sprouts.  Add the dressing and mix thoroughly.  
  4. Add in chopped pecans and avocado.  Toss gently. 
  5. Top with crumbled goat cheese and serve.  


Tuesday, February 2, 2016

#346: Buffalo Cauliflower "Wings"


I have a serious addiction when it comes to buffalo wings.  I'm not overexaggerating.  It all began at VCU (my alma matar) when eachTuesday after classes we would head down to Buffalo Wild Wings for 25 cent wing night (50 cent on Thursday for the boneless - see what I mean by 'addiction').  Anyway, as poor college students this was the best cheap dinner around for me and my friends.  I was throwing on all kinds of sauces and rubs, asking the waiters to try out a whole mix.  I basically made my way through the menu.  I'm surprised I didn't put on the dreaded freshman 15 with all of that wing eating.  

Now as a 30 year old woman, I can't be downing these fried delicious wings every Tuesday, and I have to be all healthy and eat kale every now and again (I'm acting like that's a chore, but kale is so freakin good), so I was super excited when I started hearing about the buffalo cauliflower "wing" hype.  Now I'm super familiar with cauliflower rice and cauliflower mash, but I hadn't heard about cauliflower "wings."  Let me tell you, these little guys are delicious!!

Buffalo Cauliflower "Wings"

Ingredients:
1 medium head cauliflower, chopped
1/2 cup garbanzo bean flour
1/2 cup water
1 teaspoon minced garlic or garlic powder
1/2 teaspoon salt
1 teaspoon melted butter
2/3 cup hot sauce

Directions:

  1.  Preheat oven to 450 degrees Fahrenheit.  In a medium-sized bowl, combine flour, water, garlic  powder and salt.  Whisk together until smooth.
  2. Toss cauliflower into batter, making sure to coat each piece completely, then place battered cauliflower on a lightly greased, nonstick baking sheet.  Bake for 15 minutes, flipping halfway through.
  3. In the meantime, combine melted butter and hot sauce in a large bowl, stir thoroughly.  When the cauliflower is done, remove it from the oven and gently toss it in the hot sauce mixture.  Place cauliflower back on the baking sheet and cook for an additional 25 minutes until it becomes crispy.  Allow cauliflower to cool for 15 minutes before serving (with ranch or bleu cheese dressing, duh!)


After its first round of baking, the cauliflower should just be this golden.


The melted butter + hot sauce mix (gotta love that Tapatio).


Tossed in the hot sauce mixture and back on the baking sheet for the second round of baking.


Fresh out of the oven with charred edges...yum!


Tuesday, January 19, 2016

#344: Rosemary Garlic Lamb Chops


With N arriving in DC from SF a few days after Christmas, we decided to delay the full Christmas festivities.  So on Christmas day itself our parents and I decided to still do a small but nice Christmas dinner, and wait to do the bigger meal when she got into town. 

I was thinking about the best dish to make when I came across these gorgeous thick lamb loin chops at the grocery store.  Now, I've never tried my hand at making lamb chops, so I definitely had to look through a few recipes to understand the right temperature and preparation style to cook the perfect chop, and this is what I came up with.  I was going for the crunchy/slightly charred exterior and juicy interior, and that's what I happily ended up chowing down on.  My dad enjoyed his chops thoroughly (and he's a tough one to please)!

Rosemary Garlic Lamb Chops

Ingredients:
6 lamb loin chops (about 1 1/4 inch thick chops)
1/4 cup rosemary leaves
8 garlic cloves (I like this extra garlic-y, but 4 large cloves would work just as well)
2 teaspoons salt
cracked black pepper
1/4 cup extra-virgin olive oil

Directions:
  1. In a blender toss in the garlic cloves, rosemary, olive oil and some salt & pepper.  Blend until it turns into a thick marinade.  
  2. Place the chops flat in a glass container.  Pour the marinade evenly over the chops and massage into both sides.  Refrigerate for at least 2 hours.  (I marinated them for 4 hours.)
  3. Preheat oven to 400 degrees Fahrenheit.  In a hot pan sear the chops on each side for 3 minutes and then place on an aluminum foil lined baking sheet. If you have a cast iron skillet this could work perfectly, if you can fit the chops all in (otherwise, try cooking in batches).  Searing for 3 minutes will give the outside of the chop a nice charred crust, before cooking the chops through in the oven.  
  4. Place the chops in the oven and cook with the timing below, based on how you like your chops cooked. 
  5. Once you take them out let your meat rest!  This means keeping it on the tray, not moving it, and covering it lightly with a sheet of foil for about 10 minutes.  
I was cooking these for my dad, so I cooked them well done like he likes.  

10 minutes - medium rare
15 minutes - medium
20 minutes - well cooked

To join my juicy lamb chops on our dinner plates, I made some super easy crescent rolls which I smothered with homemade vegetable cream cheese.  I also oven roasted asparagus and eggplants - simply cut them per my instructions below and drizzled them with olive oil and a sprinkle of salt and pepper and cooked them in the oven. Then tossed a balsamic glaze over them after they were cooked. 

1 medium purple eggplant, sliced into 1/3 inch slices
1 bunch of asparagus

Asparagus faces the endless controversy (to snap or not to snap).  I snapped the ends off for this particular recipe, basically the idea is to bend the end of the asparagus until it naturally snaps off, thereby removing the tough part of the asparagus.  This feels super wasteful sometimes, so in the alternative merely peeling the outside a bit can help.  Take your pick! 

The eggplant slices take about 30 minutes, turning them halfway through.  The asparagus takes just 20 minutes.  This is all at the 400 degree Fahrenheit temperature used for the lamb chops. 


The greased up asparagus before they head into the oven.


After 3 minutes and flipped over, just look at that charry goodness!


And, we flip again!


This is what they should look like right before you put them in the oven to finish cooking. 


Thursday, December 10, 2015

VA Eats: Earls Kitchen + Bar

After a long Monday, Mirona met up with me for dinner in a new section of Tysons Corner Center.  For those of you not from the area, Tysons Corner is a pretty large mall that has been in the northern Virginia area for years.  It is home to a ton of great restaurants, and now has welcome in a few more.  So, we decided to check out Earls Kitchen & Bar.  Cute story, but it’s called ‘Earls’ without an apostrophe, because the two owners share the same name, Earl.  Funny, huh? 

In any case when we walked in the place was packed.  Surprising for a Monday night in McLean, Virginia.  While we waited for our table to be ready, we enjoyed a cocktail that literally tasted like a lemon meringue pie in a glass.  That would sound good, but this was completely frozen, and not exactly my cup of tea, but the meal more than made up for my feelings on this frozen beverage. 

Mirona ordered the Baby Back Ribs, which were falling off the bone and just melted in your mouth.  They were incredible, and I was truly surprised!  I’m  particular about my ribs, and generally only order them at southern/soul food restaurants or small hole-in-the-wall joints.  For me, I just imagine that they would have better ribs than a more “fancy” restaurant.  But, boy was I wrong.  These ribs were made by someone who definitely knows what they’re doing.  The barbeque sauce was sweet and smoky, without overpowering the natural smoky flavor of the pork ribs.  So delicious!


I ordered the Jerusalem Salad.  This arugula based salad, comes served with a preserved lemon dressing, assorted colorful tomatoes, cucumbers, Moroccan spiced chicken breast and a delicious sumac yogurt.  Oh, and the pita chips crumbled into the salad.  It was a great contrast of flavors, crunchy chips and cucumber with spicy chicken and creamy yogurt – fantastic!  I would highly recommend it!  I definitely want to check out Earls again. 

Rating:  B

Tuesday, August 25, 2015

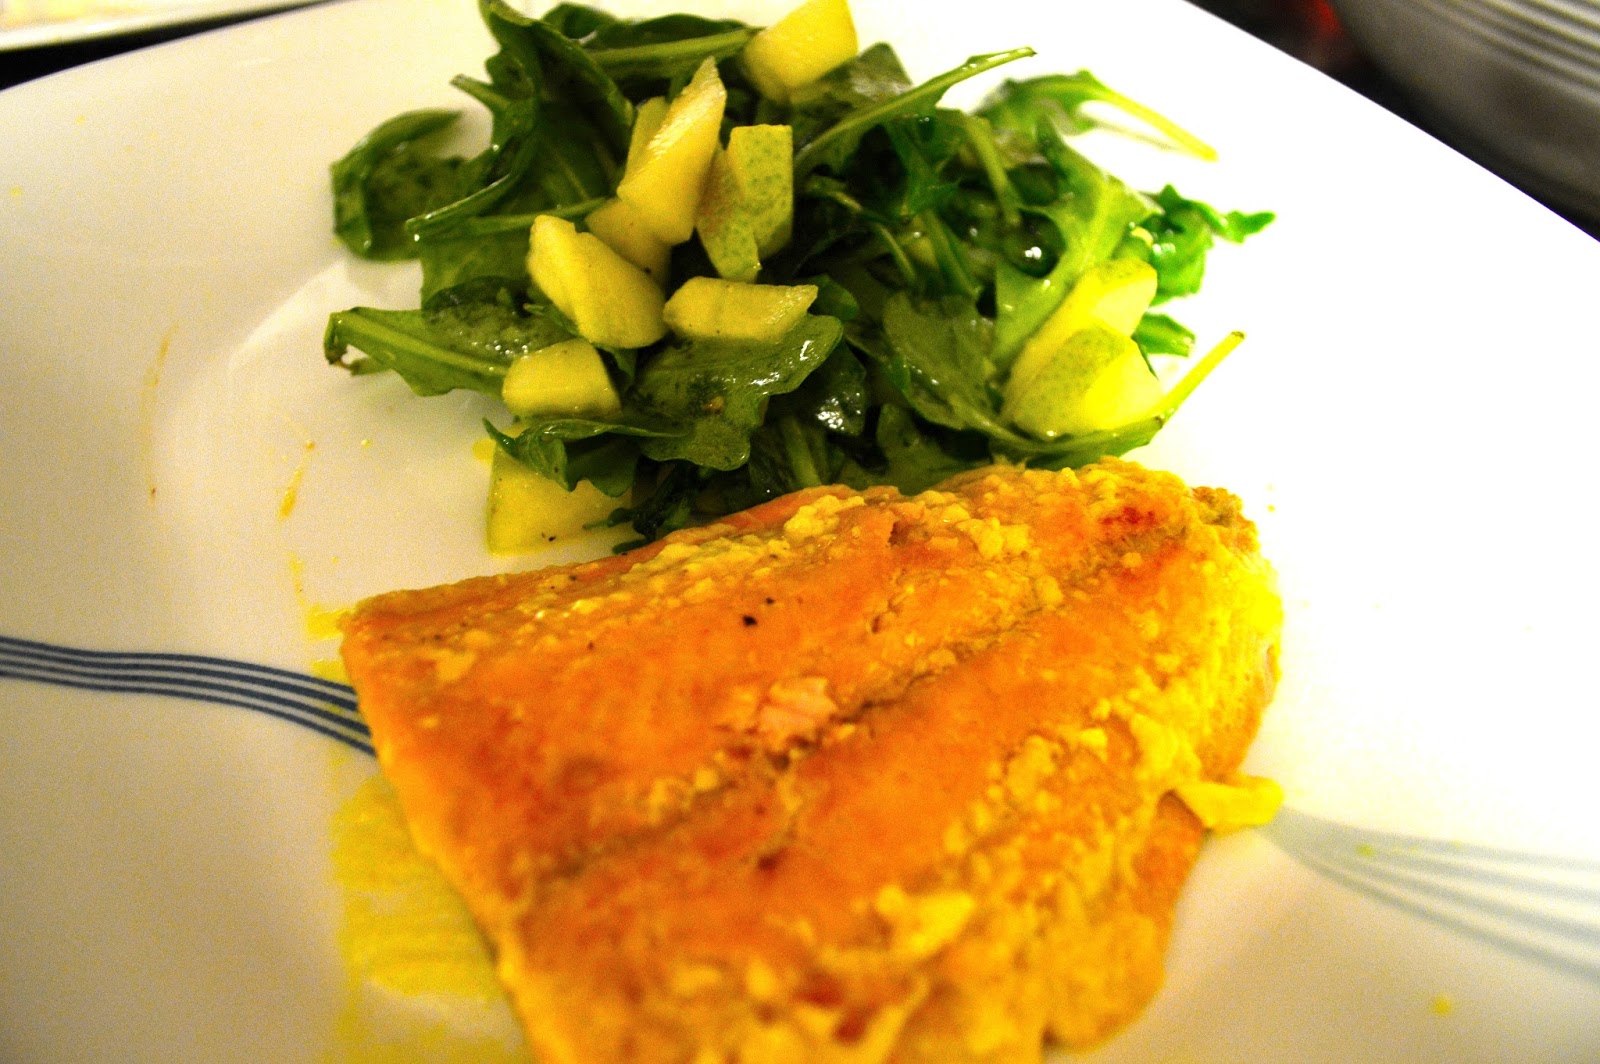
#330: Honey Mustard Salmon with Arugula and Pear Salad


I love salmon marinated with honey.  This honey mustard salmon is absolutely great.  While I used Dijon mustard, honestly you could use plain old yellow mustard.  I think the bitter flavors would contrast so well with the salmon and honey.  Plus, the arugula and pear salad follows the similar theme of sweet and bitter, which I absolutely love. 

This meal works as the perfect summertime dinner, light and healthy.  It might be easier to cook this in the oven, but sometimes (like when you run out of tin foil and hate cleaning a baking sheet) cooking on the stove top just seems easier. 


Honey Mustard Salmon - Serves 4

4 salmon filets
1 garlic clove, chopped
3 tbsps Dijon mustard
2 tbsps honey
1/2 tsp apple cider vinegar
1/2 tsp black pepper
1/2 tsp salt
1 tbsp extra virgin olive oil 
  1. In a shallow dish combine Dijon mustard, honey, vinegar, garlic, salt and pepper.  Add your fish to the mix and coat both sides. 
  2. Place oil in a saute pan on medium heat.  Remove the salmon filets from the honey-mustard mixture one at a time and add to the pan.  Make sure that just a touch of the mixture is coated on the fish, but that it is not drenched while it enters the pan because then it will splatter. 
  3. Cook for 3-4 minutes on each side.  
I used skinless salmon, but if yours has skin, cook that side first for 6 minutes, flip, and cook on the other side for 3-4 minutes.  Also, if you have a grill pan, definitely use it, it will make for gorgeous grill marks.  If you prefer to use the oven cook at 400 degrees Fahrenheit for 10 minutes.  

Arugula and Pear Salad - Serves 4

1/4 cup extra virgin olive oil
2 tbsps lemon juice
1 tsp honey
1/2 tsp Dijon mustard
1/2 tsp salt
1/4 tsp black pepper
3 pears (Barlett is what I used), cored and sliced lengthwise 
6 cups arugula
  1. In a small bowl, mix together olive oil, lemon juice, honey, dijon mustard, salt and pepper. 
  2. In a large bowl toss together the arugula and pear.  If you had pumkin seeds, pine nuts or walnuts (anything with crunch effect) to add, this is the time to do it.  
  3. Then drizzle your salad dressing over the salad and toss.  Top with gorgonzola cheese or grated parmesan. 

Tuesday, August 11, 2015

#329: Zucchini Noodles


I finally joined the zucchini noodle, or "zoodle," bandwagon.  With everyone trying to be healthier lately, and honestly, just not being as hungry in the summer month, zucchini noodles are the perfect fix when you're just craving a big bowl of pasta with a ton of sauce on time - I'm an extra sauce kind of girl. 

With zoodles, you can prepare them in a pan with a little olive oil, in a vegetable steamer, or just boil them for about 5 minutes like I did.  Since making this recipe I've tried just tossing the spiralized zucchini into a pan with olive oil and it works just as easily, so really everyone can make this to their preference...there's no real recipe.  So, this post will be a bit different and I'll just highlight to you the three ways I've made zoodles.  

I recently went out and bought a spiralizer.  I should've taken a picture of it for you all, but next time. It's a small, cupboard friendly version.  When you share a kitchen with a roommate, it just makes things all the more easier and saves you some counter space.  

This was my first venture into making zucchini noodles, and I have to say it was super simple and the perfect weeknight dinner.  I actually tried parsnip noodles the other day - yes, you can spiralize pretty much any veggie and turn it into a base for a fantastic fake-noodle based dish.  

This time I cheated and mixed my zoodles in with some gluten-free pasta I had laying around in my refrigerator.  


Then I topped the whole dish with an easy spaghetti sauce I made, with ground turkey, carrots, tomato sauce, garlic, basil and oregano. 

And, I mean of course you have to top the whole thing with basically a pound of grated Parmesan.  Just kidding!  But, I think it's okay to be heavy handed here. 


Zoodles via Sauce Pan:  Simply spiralize (or thinly slice or use a vegetable peeler) your zucchini.  I think one large one is sufficient for one serving.  Heat 1 tablespoon olive oil in a sauce pan.  Add your zucchini noodles and cook for 3-5 minutes or until tender. 

Zoodles via Vegetable Steamer:  Place the spiralized zucchini in your vegetable steamer.  Fill a pot with about an inch and a half of water, place in your vegetable steamer and let the pot come to a boil.  Cover with a lid and cook for 3 minutes or until tender.

Zoodles via Boiling:  Place 3/4 cup of water in a small pot. Bring it to a boil and add in your spiralized zucchini noodles.  Cook for 3-5 minutes or until tender.  Drain the remaining water, and you're ready to eat! 


Tuesday, August 4, 2015

#328: Spicy Garlic-y BBQ Chicken


Who doesn't enjoy Barbeque Chicken, particularly in the summer months?  I know many of you enjoy juicy perfectly cooked chicken, and I mean, of course I do, but I also love having portions of chicken charred a bit.  It's the best of charred ends with a tender juicy chicken thigh (or breast).  This time around I made chicken thighs and instead of hauling them out to the grill, I just gave these an initial hot sear on the stove, and popped them into the oven to finish cooking (with a quick baste in the middle of the cooking time).  These turned out fantastic.  

The recipe is a combination of a Chipotle Chicken Marinade my roommate and I made and used on chicken last month, with some of this amazing Alamo Spicy BBQ Sauce my mom picked up on her recent trip to San Antonio.  It made for a spicy, sweet and garlic-y finish to the chicken.  With a side of collard greens,  I was completely content! 


Spicy Garlic-y BBQ Chicken - Serves 2

4 Chicken Thighs, skinless and boneless
1 cup barbeque sauce
3 habanero peppers, chopped
1/2 cup Chipotle chicken marinade
1/2 tbsp McCormick Jerk Seasoning
1/2 tbsp salt

Directions

  1. I made the marinade used in this recipe for Chipotle Chicken over a month ago and had some saved over, so I used 1/2 cup of this marinade.  I recommend making it and saving it, because it is absolutely fabulous.  But, if you'd prefer not to, I would just recommend using 2 ancho peppers (rehydrated and blended) + four garlic cloves.  If you prepare this mixture it will work just as well. 
  2. After you've done either, then we can proceed with the recipe.  Chop up your habanero peppers.  If you want less heat, take out the veins and the seeds.  
  3. In a bowl add your barbeque sauce, the Chipotle marinade (or ancho pepper + garlic mixture), McCormick Jerk Seasoning and salt.  Mix thoroughly with a spoon or whisk. 
  4. Add your chicken thighs to the bowl and coat thoroughly with the marinade.  It might seem like there's a lot of marinade, but trust me you'll want the extra for basting during the cooking process. 
  5. I let the chicken marinate overnight, but if you don't have time 1 hour is fine.  
  6. When you are ready to cook, preheat the oven to 400 degrees Fahrenheit. 
  7. Then take out a pan and add 1 tbsp olive oil to the pan.  Allow the heat to rise to medium-high.  Remove the chicken thighs from the marinade and add to the pan.  Make sure that you take off as much of the marinade from the outside of the chicken before adding to the pan to avoid splatter.  Let it sear for about 1 minute per side.  
  8. Place the seared chicken in an oven safe casserole dish.  Baste with half of the marinade.  Cook in oven for 25 minutes. 
  9. Then take out and baste with the remaining marinade.  (Note - You can remove the chopped habanero peppers if you would prefer).  Turn the heat to high broil and let the chicken broil for 5 minutes.  
Serve with a side of collard greens, green beans, macaroni and cheese, or potato salad!  


Sunday, February 1, 2015

#313 Roast Chicken, By: V

This was a quiet week and happy to have it that way.  Friday I'll be off to Cabo San Lucas for the weekend on a bachelorette trip with a dear college friend of mine, and three others.  Looking forward to the good times and to getting away from this cold weather!  

Yesterday, we braved the fiercely cold winds and went to the Washington Auto Show, which has been going on in D.C. for the past two weeks.  It was my first time attending an auto show, and I have to say it was fun sitting in different cars and checking out some classic cars - which always look so cool!  Afterwards, S and I went to our favorite spot for pizza, Matchbox, and shared our go-to choice  -Fire & Smoke Pizza (and we top it with some chicken).  The base of the pizza is a chipotle pepper tomato sauce, and the pizza is topped with spanish onions, fire-roasted red peppers, garlic puree, smoked gouda and fresh basil.  It's spicy, but delicious! 

Then we went home and I made this quick Roast Chicken dish (quick in terms of prep time and easiness), to have fo lunch this week.  Today's a big day in U.S. culture haha - it's SUPER BOWL SUNDAY.  Usually I have plans for what I'm going to make to snack on, but not so much this week.  I'm rooting for the Seahawks, solely because their Quarterback and another player are Virginia natives - so, of course I have to support! 

With Cabo San Lucas next weekend, my next post may not be until the following Sunday (Valentine's Day weekend!).  But, I hope you all enjoy this recipe and have a wonderful week ahead! 


Roast Chicken

Ingredients:
  • 2  3 lb. chickens
  • Salt and Black Pepper
  • 1/2 cup fresh thyme, chopped
  • 2 lemons, quartered
  • 6 garlic cloves
  • 4 tbsps softened butter
  • 1 large yellow onion, thickly sliced
Directions:
  1. Preheat the oven to 425 degrees F.
  2. Remove the chicken giblets.  Rinse the chicken inside and out.  Remove any excess fat and pat the outside dry.
  3. Liberally salt and pepper the inside of the chicken.
  4. Stuff the cavity of each chicken with 1 lemon and half of the sliced onion.  
  5. In a bowl add the softened butter and thyme.  Mix together.  With your hand spread this mixture under the skin on the outside of each chicken.  
  6. Place 3 garlic cloves under the skin of each chicken. 
  7. Surround the chickens with veggies of your choices - carrots, potatoes, parsnips, broccoli, eggplant, tomatoes (literally anything of your choice). 
  8. Bake in the oven for 1 1/2 hours or until the juices run clear when you cut between a leg and thigh.  
  9. Remove the chicken and vegetables to a platter and cover with aluminum foil for 20 minutes before serving.  This will make the meat juicy.
I made this easy dish yesterday and plan on eating it atop a salad or in sandwiches for my lunch this week.  

Tuesday, January 13, 2015

#310 Bon Voyage Brunch, By: V

Before N headed back to San Francisco I had her over for brunch with S and I.  I took help from the store and bought some Pillsburry Cinnamon Rolls and Hash Browns.  When N and I were little girls our mom would make cinnamon rolls every Saturday morning.  As an adult, the mere smell of cinnamon rolls reminds me of those Saturday mornings, and I know how much N loves them! Another N favorite, are hash browns, I modified the store bought hash browns by adding green peppers, onions and spices for added flavor.  Here's the full brunch menu:

Oven Broiled Sausage and Tomatoes
Spinach, Mushroom and Feta Frittata 
Pepper and Onion Hash Browns
Cinnamon Rolls
Berries and Nectarine drizzled with honey


N brought me some delicious ground coffee from a wonderful coffee shop we visited when I was out in San Francisco this summer (Sightglass), so I brewed up some coffee for all of us to enjoy.  We sat around and munched on all of the breakfast food, while watching a few funny YouTube videos that S just had to share!  It was the perfect way to spend the last day with N before she left for San Francisco.  


Pepper and Onion Hash Browns

INGREDIENTS:
Ore-Ida 2 lb bag of Diced Hash Brown Potatoes
1/2 jalapeno, chopped
1/2 green bell pepper, diced
1/2 cup onion (yellow or red), diced 
2 tbsps olive oil
1 tbsp garlic powder
1/4 tsp paprika
1/4 tsp thyme

DIRECTIONS:
  1. To a large non-stick saucepan add 1/2 the bage of Ore-Ida Diced Hash Brown Potatoes.  Cook per directions on the bag.  You can also use fresh potatoes, but I would recommend piercing them with a fork and cooking them per your microwave directions for a baked potatoes, then cut them up and add them to a pan with about two tbsp of olive oil to cook. 
  2. In a small saucepan add 2 tbsp olive oil, green bell pepper, jalapeno and onion.  Let this mixture cook down until the peppers are softened and the onion is translucent.  
  3. Turn the heat off and add the spices.  Mix together and then add to the cooked hash brown potatoes.  
  4. Let this cook on medium heat for ten minutes just to allow the flavors of the spices and pepper/onion mixture permeate the potatoes. 
Turkey Links with Roasted Tomatoes

INGREDIENTS:
13.5 oz package of Hillshire Farm Turkey Polka Kielbasa (or any cooked sausage)
8 oz. Medley Tomatoes (variety of colored tomatoes or cherry tomatoes can be used)
2 tbsps olive oil

DIRECTIONS
  1. Preheat the oven to a high broil.
  2. Cut each tomato in half lengthwise.  Cut each sausage link in half.  
  3. Arrange the tomatoes and sausages on top of foil laid on a baking sheet. 
  4. Drizzle the olive oil over the tomatoes and sausages and toss them to coat. 
  5. Bake in the oven on a high broil for 20 minutes until the sausage skin has blistered.  
Spinach, Mushroom and Feta Frittata

INGREDIENTS:
8 oz. fresh mushrooms (I used baby portabella, but anything will work)
1/2 tsp minced garlic
non-stick spray
1 10 oz. box of frozen spinach
4 large eggs
1 cup milk
2 oz. feta cheese
1/4 cup grated parmesan cheese
1/4 cup shredded mozarella cheese
salt and pepper to taste

DIRECTIONS:
  1. Preheat your oven to 350 degrees. If your frozen spinach is not already thawed, thaw it in the microwave. Place the spinach in a colander and let it drain while you begin to prepare the rest.
  2. Slice the mushrooms thinly.  Place the sliced mushrooms in a skillet coated with non-stick spray, add the garlic, and sprinkle a little salt and pepper. Turn the heat on to medium-high and saute the mushrooms for about 10 minutes, until they are brown and any liquid released has evaporated. 
  3. Spray a dish with non-stick spray. Squeeze the rest of the water out of the spinach and spread it out on the bottom of the pie dish. Next add the cooked mushrooms and crumbled feta. 
  4. In a medium bowl whisk together the eggs.  Add the milk, parmesan, and another small sprinkle of salt and pepper.  Whisk to combine. Pour this mixture into the dish over the spinach, mushrooms, and feta.
  5. Sprinkle the shredded mozzarella cheese over top. Place into the preheated oven and bake until it is golden brown on top.  Bake for 1 hour and serve. 

This week we had some serious snow in the D.C. area.  Worked from home one day and slowly trekked into the office the next.  Even with all the messy roads I managed to catch dinner with a good friend at RANGE, a restaurant by Bryan Voltaggio, who placed second to his brother in the televised cooking competition, Top Chef (he was in Season 6).  RANGE serves modern American cuisine. The food was pretty good, although I heard through a law school classmate of mine that Voltaggio's restaurant, Family Meal, is much better.  This might be a place I'll have to check out! 

We started off my order a drink called What's With All The Tattoos? and what came to the table was certainly a surprise.  I asked the waiter how the bartender managed to get these images on top, and much like the writing floating atop my foamy drink says, the bitters placed on top of the drink formed this magnificent creation.  
For the first course I ordered the Bone Marrow topped with a mixture of shallots, pinenuts and raisins.  I scooped the marrow and placed it on the toasted bread - delish!  Yes, marrow can often appear unalluring, but the contrast of taste with the fatty marrow and the sweet/sour shallot mixture was great spread atop a piece of crusty bread.  

For the second course I ordered the Market Cod with cured lemon, fried capers and brown butter.  I was curious about the taste of fried capers, but it was absolutely great.  Crunchy on the outside with the bitter tang that I love in capers! My friend ordered the Pork Belly (pictured in the back), which came topped with a crispy pork rind, vanilla sauce and fennel.

We ended the meal with our own Molasses Cake topped with a spiced sorbet.  It came in a small sized cast iron skillet and was deliciously warm.


Print Friendly

Print Friendly Version of this pagePrint Get a PDF version of this webpagePDF