Showing posts with label Vegetarian. Show all posts

Tuesday, February 2, 2016

#346: Buffalo Cauliflower "Wings"


I have a serious addiction when it comes to buffalo wings.  I'm not overexaggerating.  It all began at VCU (my alma matar) when eachTuesday after classes we would head down to Buffalo Wild Wings for 25 cent wing night (50 cent on Thursday for the boneless - see what I mean by 'addiction').  Anyway, as poor college students this was the best cheap dinner around for me and my friends.  I was throwing on all kinds of sauces and rubs, asking the waiters to try out a whole mix.  I basically made my way through the menu.  I'm surprised I didn't put on the dreaded freshman 15 with all of that wing eating.  

Now as a 30 year old woman, I can't be downing these fried delicious wings every Tuesday, and I have to be all healthy and eat kale every now and again (I'm acting like that's a chore, but kale is so freakin good), so I was super excited when I started hearing about the buffalo cauliflower "wing" hype.  Now I'm super familiar with cauliflower rice and cauliflower mash, but I hadn't heard about cauliflower "wings."  Let me tell you, these little guys are delicious!!

Buffalo Cauliflower "Wings"

Ingredients:
1 medium head cauliflower, chopped
1/2 cup garbanzo bean flour
1/2 cup water
1 teaspoon minced garlic or garlic powder
1/2 teaspoon salt
1 teaspoon melted butter
2/3 cup hot sauce

Directions:

  1.  Preheat oven to 450 degrees Fahrenheit.  In a medium-sized bowl, combine flour, water, garlic  powder and salt.  Whisk together until smooth.
  2. Toss cauliflower into batter, making sure to coat each piece completely, then place battered cauliflower on a lightly greased, nonstick baking sheet.  Bake for 15 minutes, flipping halfway through.
  3. In the meantime, combine melted butter and hot sauce in a large bowl, stir thoroughly.  When the cauliflower is done, remove it from the oven and gently toss it in the hot sauce mixture.  Place cauliflower back on the baking sheet and cook for an additional 25 minutes until it becomes crispy.  Allow cauliflower to cool for 15 minutes before serving (with ranch or bleu cheese dressing, duh!)


After its first round of baking, the cauliflower should just be this golden.


The melted butter + hot sauce mix (gotta love that Tapatio).


Tossed in the hot sauce mixture and back on the baking sheet for the second round of baking.


Fresh out of the oven with charred edges...yum!


Tuesday, October 13, 2015

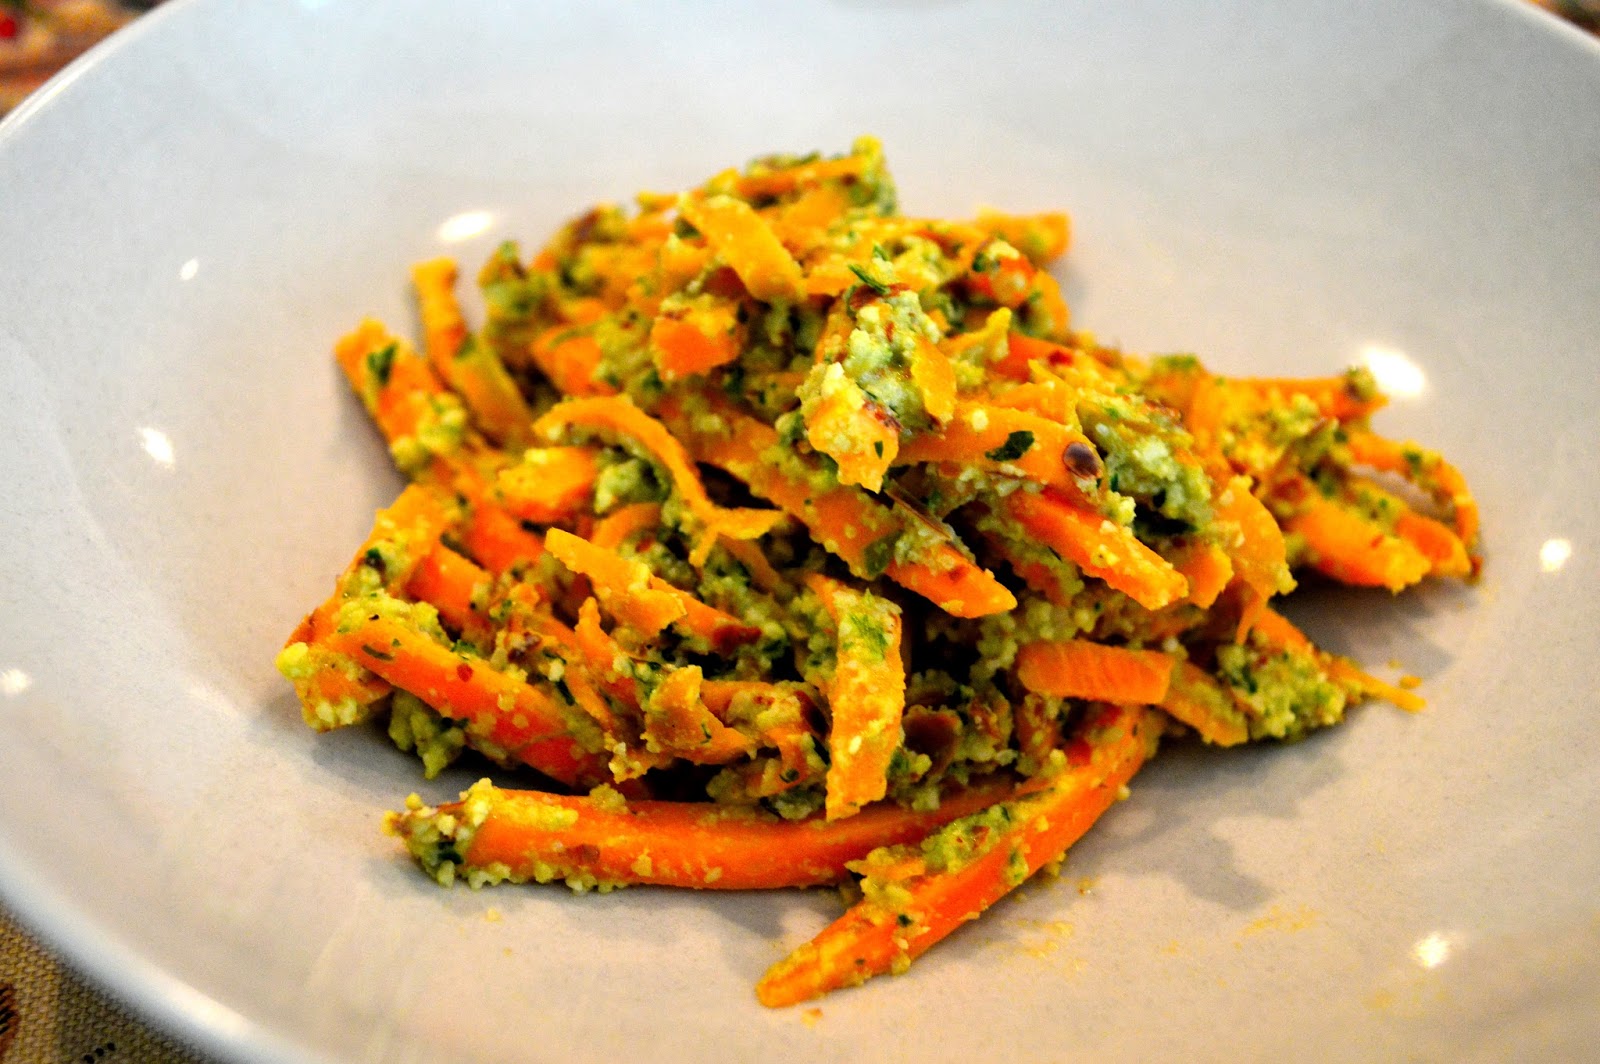
#335: Sweet Potatoes with Almond Pesto


Sweet Potatoes with Almond Pesto

Ingredients

2 medium sized sweet potatoes, washed, peeled, and chopped into matchsticks (or spiralized)
1 tablespoon coconut oil
1/2 teaspoon of garlic, minced
1/2 teaspoon of salt
1/4 teaspoon of black pepper
3 tablespoons chopped flat leaf parsley
1 teaspoon white bleached flour
3 tablespoons milk (cream, unsweetened almond, half and half, skim, most unflavored milks should work)
1/4 cup sliced, blanched natural almonds
3/4 cup hot water

Directions:
  1. Blanch the almonds:  Place the almonds in a bowl.  Pour boiling water to barely cover the almonds.  Let them sit for 2 minutes to soften, drain and set aside. 
  2. In a deep bowl (cylindrical container if you have one), place the almonds, parsley, flour, garlic, water and milk.  Use a hand blender to blend the entire mixture until it’s creamy but still a bit grainy and chunky.  It will end up a thick texture, so, if you want it looser, I’d add some more milk.   Set aside. 
  3. Use the knife or spiralizer to turn your two sweet potatoes into matchsticks or noodles.  In a salute pan or shallow pan on medium-high heat, add the coconut oil, then add the spiraled sweet potatoes.  Cover and let cook for 5-7 minutes, uncovering to toss halfway through, until sweet potatoes are cooked through.  
  4. Add the pesto cream to the cooked sweet potatoes, and stir thoroughly.  

This dish was intended to be vegan, so I used almond milk and no cheese at the end, but obviously if you love and eat cream and cheese, I will NOT stop you from using them! 


Tuesday, October 6, 2015

#334: Grilled Eggplant Pita Banh Mi


Banh Mi is a Vietnamese sandwich made on french bread, and topped with cilantro and pickled daikon.  Falls Church, Virginia is home to a shopping center, Eden Center, filled with Vietnamese grocery stores, shops, restaurants and bakeries.  The bakeries there are home to some of the most delicious french breads perfect for a banh mi.  Most of these bakeries and sandwich shops offer banh mi sandwiches filled with pork, beef or chicken, with the obligatory vegetarian option - tofu.  

We took a twist on the traditional banh mi sandwich, by first using a whole wheat pita pocket, and my swapping out the tofu, for grilled eggplant.  While a cucumber sauce is also atypical of most banh mi sandwiches, I like how our version is sort of a Mediterranean take on what is a traditional Vietnamese (influenced by the French) sandwich.  This Grilled Eggplant Pita Banh Mi, is the perfect lunch dish for meatless mondays, or just when you want a lighter option, but one that is still full of delicious flavor.  


Grilled Eggplant Pita Banh Mi

Ingredients:
1 large eggplant, cut into 1/2 inch thick rounds
5 whole wheat pitas
lettuce and cilantro, chopped
For the Marinade:
2 tbsps soy sauce
2 tbsps lime juice
1 tbsp honey 
1/2 tsp crushed red chili flakes
1/2 tsp ginger paste (or grated ginger)
1 tbsp lemongrass, chopped fine and crushed
1 tsp fish sauce (optional)

 In a small bowl whisk together the ingredients for the marinade.  Set aside. 

For the pickled radishes and carrots
1/4 cup red radishes, sliced into long thin strips 
1/4 cup carrots, sliced into long thin strips
1/2 cup apple cider vinegar
1/4 cup water
2 tbsps sugar
salt and whole black peppercorns

Boil the apple cider vinegar, water, pepper  and sugar. Turn off the heat, cool a little and
add the vegetables to make a quick pickle. Toss thoroughly.  Set aside.

For the cucumber sauce:
2 basil leaves, julienned  
4 tbsps sour cream
2 tbsps grated cucumber
1 tsp lime juice
salt and black pepper 

Mix the ingredients together in a small bowl.  Set aside.

Directions:
  1. Marinate the eggplant slices in the marinade for 5-6 hours.
  2. Heat the grill and grill the eggplant on both sides basting them with the extra marinade.
  3. Grill until cooked, remove each slice from heat and keep aside.
  4. Toast each pita and cut into two halves.
  5. Apply the cucumber sauce a little and stuff each half with eggplant slices, lettuce and     cilantro.
  6. Top with pickled vegetables and extra cucumber sauce before serving.

Tuesday, September 15, 2015

#332: Mushroom and Bok Choy Hakka Noodles


Large scale Asian grocery stores are increasingly becoming common place, and I am not complaining.  These stores always seem to have the freshest produce, lower prices, and aisles upon aisles of chili sauces and noodles...two things I love.  So, on a recent trip to Lotte Plaza, my local Asian grocery store, I stocked up on a ton of greens and these mushrooms which I added to a dried noodle mix I found at the store.  


The array of greens can be a bit overwhelming, but I'm always one to try them all out.  This time I picked up the Shanghai Bok Choy.  It's green from stem to leaf, but a more muted green than on the usual Baby Bok Choy we are all so familiar with.  The flavor is fairly similar, but with a little less crunch in the Shanghai version.  


Really this dish is just about incorporating the vegetables at your grocery store that are the most appealing, and making a great vegetarian dish for your "meatless Monday."  Or, in the alternative, add chicken (or a poached egg on top of the dish). 


Ingredients

2 tbsps coconut oil

1/2 tsp grated ginger
1/2 tsp chopped garlic
1/2 tsp ground all spice
6 cups chopped Shanghai Bok Choy(but seriously, any of these Asian greens would probably work just as well: A Visual Guide to 10 Varieties of Asian Greens)
8 cups sliced mushrooms (baby portobellos or shitake)
2 tsps fish sauce
2 tbsps soy sauce
Ching's Secret Veg Hakka Noodles

To top for added heat:  Sriracha (or Rooster Sauce)

Directions

  1. In a wok on low heat add 1 tbsp coconut oil, ginger and garlic.  Let the oil melt and the ginger and garlic start sizzling a bit.  Turn the heat to high, add the all spice and stir into the oil.  Then add the mushrooms and mix into the spice mixture completely.  Let the mushrooms cook for 5 minutes.  Then add the other 1 tbsp of coconut oil and baby bok choy.  
  2. Let the veggies cook until they are cooked through, this should take about 10 minutes after you've added in the baby bok choy.  
  3. Then stir in the fish sauce and soy sauce.  
  4. Break up the dry noodles in your hand right into the wok.  There should be enough liquid in the pan to cook the noodles through and take on all of the flavors from the vegetables and sauce.  Once the noodles are cooked and the liquid is gone turn the heat off and serve.

Tuesday, August 11, 2015

#329: Zucchini Noodles


I finally joined the zucchini noodle, or "zoodle," bandwagon.  With everyone trying to be healthier lately, and honestly, just not being as hungry in the summer month, zucchini noodles are the perfect fix when you're just craving a big bowl of pasta with a ton of sauce on time - I'm an extra sauce kind of girl. 

With zoodles, you can prepare them in a pan with a little olive oil, in a vegetable steamer, or just boil them for about 5 minutes like I did.  Since making this recipe I've tried just tossing the spiralized zucchini into a pan with olive oil and it works just as easily, so really everyone can make this to their preference...there's no real recipe.  So, this post will be a bit different and I'll just highlight to you the three ways I've made zoodles.  

I recently went out and bought a spiralizer.  I should've taken a picture of it for you all, but next time. It's a small, cupboard friendly version.  When you share a kitchen with a roommate, it just makes things all the more easier and saves you some counter space.  

This was my first venture into making zucchini noodles, and I have to say it was super simple and the perfect weeknight dinner.  I actually tried parsnip noodles the other day - yes, you can spiralize pretty much any veggie and turn it into a base for a fantastic fake-noodle based dish.  

This time I cheated and mixed my zoodles in with some gluten-free pasta I had laying around in my refrigerator.  


Then I topped the whole dish with an easy spaghetti sauce I made, with ground turkey, carrots, tomato sauce, garlic, basil and oregano. 

And, I mean of course you have to top the whole thing with basically a pound of grated Parmesan.  Just kidding!  But, I think it's okay to be heavy handed here. 


Zoodles via Sauce Pan:  Simply spiralize (or thinly slice or use a vegetable peeler) your zucchini.  I think one large one is sufficient for one serving.  Heat 1 tablespoon olive oil in a sauce pan.  Add your zucchini noodles and cook for 3-5 minutes or until tender. 

Zoodles via Vegetable Steamer:  Place the spiralized zucchini in your vegetable steamer.  Fill a pot with about an inch and a half of water, place in your vegetable steamer and let the pot come to a boil.  Cover with a lid and cook for 3 minutes or until tender.

Zoodles via Boiling:  Place 3/4 cup of water in a small pot. Bring it to a boil and add in your spiralized zucchini noodles.  Cook for 3-5 minutes or until tender.  Drain the remaining water, and you're ready to eat! 


Tuesday, June 30, 2015

#323: Baby Bok Choy with Butter Beans and Thyme


This side dish, or quinoa bowl topping, is incredibly simple and fast to prepare.  Bok choy also isn't one of those cumbersome veggies to prep, so that's certainly a plus.  No peeling or chopping through a hard outer shell, woohoo!  I liked adding thyme in here, because as you usually see bok choy in Chinese dishes, using butter beans and thyme allows for a different approach to preparing a bok choy dish, and I have to say I like changing things up a little. Expect the unexpected! 

Baby Bok Choy with Butter Beans and Thyme

Ingredients
1 tbsp coconut oil or olive oil
1 pound baby bok choy (about four heads)
One 15-oz can butter beans, drained and rinsed
1 tbsp dried thyme
salt and pepper to taste

Directions
  1. Cut the stems from the bok choy and the leafy tops into 1 inch pieces.  
  2. Add your oil to a sauce pan or skillet and let it heat up on medium-high heat.  
  3. Add your bok choy stems to the skillet and cook until slightly softened, about 2 minutes.
  4. Add the butter beans to the pan and let them warm through for about 1 minute.  Then add in your thyme. 
  5. Immediately after adding your thyme add in your bok choy "leafy tops" and let them cook until wilted, about another 1 minute.
This is the perfect side dish for grilled chicken or pork, or include it as a protein filled topping for a quinoa bowl (I tried this out one day for lunch and it was delicious).  


Tuesday, June 23, 2015

#322: Roasted Beet Salad with Lemon Vinaigrette and Hard Boiled Egg, By: V


Local? Organic? The variety of vegetables that are available to consumers has seriously grown in the past few years.  Now, at your local grocery store there's a whole section dedicated to organic vegetables.  I picked up a bunch of organic beets, with lush green leafy tops and bright purple stems.  When I arrived back at my apartment I washed them down and cut the tops off the bulbous bottoms.  They were sitting on my chopping block and I thought the simplest way to make them, and to be quite honest, the way to cook them that had me most curious about the resulting taste, was to roast them in the oven. 

I pulled out a baking sheet, chopped up the beets and included the green tops and stems as well.  The whole mixture was tossed in olive oil, salt and pepper and roasted for about 35 minutes.  Delicious!! They came out sweet but with this earthy taste.  I mixed a quick lemon and olive oil vinaigrette and tossed the mixture lightly in the dressing.  I didn't want to wilt down the greens with a heavy dressing, so went lightly at first and added more later...I love citrus.  A hard boiled egg on the side finished the meal off with added protein.  This was a simple and great dinner meal for a weeknight, albeit a weeknight when I was patient enough to wait for 35 minutes while my beets roasted instead of stuffing my face upon entering my apartment with the first dish I pull out of the refrigerator.  Try this recipe with beets, and if beets aren't your thing, try this preparation with any root vegetable and/or greens.  


Roasted Beet Salad with Lemon Vinagrette and Hard Boiled Egg - Serves 4

Ingredients 
8 beets
1 1/2 tbsps olive oil
1 teaspoon salt
1 teaspoon black pepper

Lemon Vinaigrette 
2 tbsps lemon juice
1/2 tsp mustard
4 tbsps olive oil
1/4 tsp salt
black pepper to taste

Directions

  1. Preheat your oven to 400 degrees Fahrenheit.  
  2. Cut the beet off the stems and greens.  Chop up the tops (greens and stems) and keep them to the side. Peel your beets with a vegetable peeler.  Then cut the beets - size doesn't really matter here, bite sized or larger, your preference!
  3. Place the cut beets and tops on a baking sheet, and toss with olive oil, salt and pepper.  Roast for 35 minutes.  Stir halfway through the baking process just to ensure full roasting on all sides.
  4. While the beets are cooking prepare the lemon vinaigrette.  I like to use a mason jar to prepare salad dressing.  Add all of the ingredients to a jar (or bowl) and shake up the jar (or whisk/stir the bowl) until the vinaigrette is mixed through.
  5. Take the beets and tops out of the oven and place into a bowl.  Add your vinaigrette, just a drizzle at first.  Then you can always add more once the dish is plated, all depending on your taste.
  6. Cut and add a hard boiled egg to your salad.  I like the added protein and creaminess of the yolk.  


Print Friendly

Print Friendly Version of this pagePrint Get a PDF version of this webpagePDF